What the first 20 minutes of learning piano in VR actually look like
A minute-by-minute walk through a first Museverse piano session on Meta Quest - calibrating your real keyboard, seeing the notes from your own point of view, and playing a real song by minute 20.
On this page
- Minute 0 to 3: your real keyboard appears in the headset
- Minute 3 to 8: the first notes, seen from your own point of view
- Minute 8 to 15: the practice loop that keeps you going
- Minute 15 to 20: the first song, and why it is a real one
- What you need before you put the headset on
- What the first session does not do yet
Most people who want to learn piano never make it past the first week. Not because piano is impossibly hard, but because the first sessions feel like homework: a diagram of a keyboard, a video of somebody else's hands, and a lot of looking back and forth between a screen and the keys.
We built Museverse so the first 20 minutes feel different. Here is what actually happens when you put on a Meta Quest, plug in a keyboard, and start the piano path for the first time - minute by minute, with nothing skipped.
Minute 0 to 3: your real keyboard appears in the headset
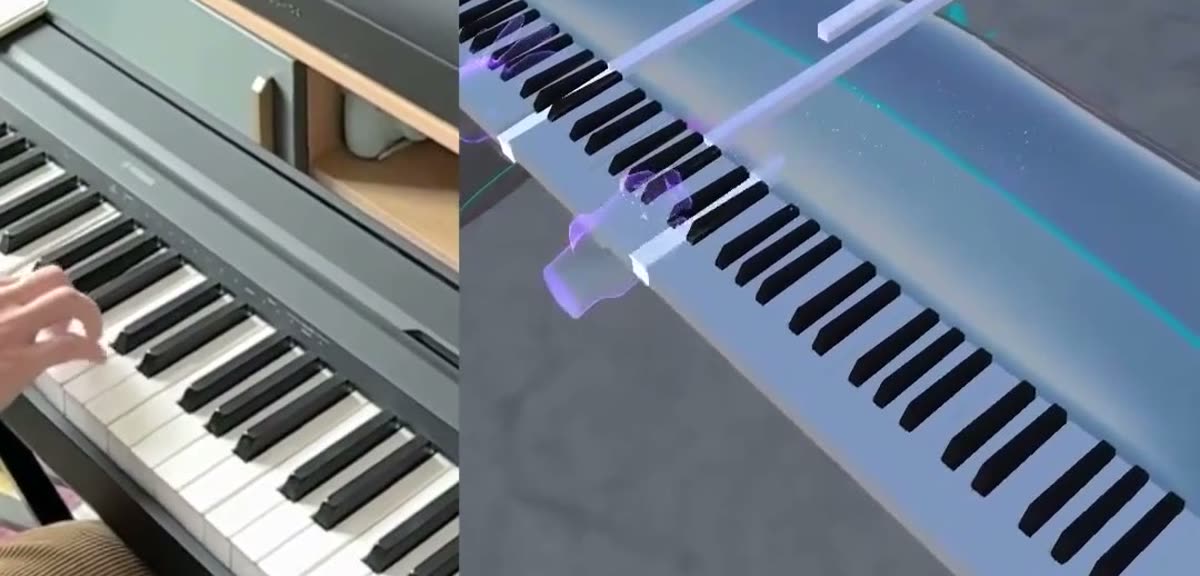
Museverse does not give you a fake piano to poke at. It uses the one on your desk. You connect a keyboard over USB or Bluetooth MIDI, and a quick three-step wizard aligns the virtual keys with your real ones, key for key. That is the whole calibration.
From that moment the virtual keyboard sits exactly where your physical one is, with passthrough showing your real hands and your real room around it. Press a key and the note lights up in the headset at the same instant it sounds. If the two ever drift apart, you press two keys again and it snaps back.
Minute 3 to 8: the first notes, seen from your own point of view
The first lesson is deliberately small: three notes, one hand, a slow tempo. What is different from a phone app is where the instruction lives. Instead of a diagram somewhere above the keys, the notes come down onto the exact keys you should press, and a pair of guide hands plays them in front of you from your own point of view - the angle you would have if you were sitting on a teacher's lap.
That angle matters more than it sounds. On a flat screen you constantly look away from the instrument to follow along, and every glance costs you the beat. In the headset the lesson is on the keyboard, so your eyes stay where your hands are.
Minute 8 to 15: the practice loop that keeps you going
Every lesson runs the same loop: watch, try, get feedback, try again. The feedback is immediate and specific - a note played early, late, or on the wrong key is marked as it happens, not in a report afterwards - and the loop is short enough that repeating it feels like retrying a level, not redoing an exercise.
There is a score, and there are 36 lessons per instrument across three difficulty tiers (easy, medium, hard), but in the first session you will only see the easy tier. The point at this stage is not mastery. It is getting your hands to do a small thing correctly, several times in a row, while it still feels like play.
A few things we deliberately keep out of the first 15 minutes:
- No music theory lecture. You will learn what a chord is by playing one, not by reading about it.
- No sheet music. Notation comes later, once your hands already know a few shapes.
- No timer pressure. Lessons are bite-sized on purpose so you can stop after any one of them.
Minute 15 to 20: the first song, and why it is a real one
Around the 15-minute mark the lessons stop being fragments and become a song. Not a nursery-rhyme stand-in - a piece with a melody you recognise, simplified to one hand and a handful of notes, at a tempo you can actually hold.
Playing something you know, end to end, is the moment most beginners describe as the one that made them come back the next day. It is also why we front-load it. Most players get there in about 20 minutes; some take 30. Either way it happens in the first session, not the first month.
What you need before you put the headset on
- A Meta Quest headset with Museverse installed from the Meta Quest Store.
- A keyboard with USB-MIDI or Bluetooth MIDI output. Any size works; more keys just means more songs later.
- A USB-C cable or adapter if your keyboard is USB, or Bluetooth pairing if it is wireless.
- Room to sit at the keyboard with the headset on - a normal desk is fine, passthrough handles the rest.
No internet is needed for the session itself. Museverse works offline once installed.
What the first session does not do yet
We would rather be honest than impressive. The first session will not tell you what to practice next based on how you played - that adaptive tutoring is something we are prototyping, and it is not in the app today. What ships now is real-time feedback and scoring on every note, which is already more than a video can give you.
It also will not make you a pianist in 20 minutes. Nobody can. What it will do is get you past the part where most people quit, and into the part where practice starts to feel like something you want to do.
Frequently asked questions
Do I need a real piano keyboard to learn piano in Museverse?
Yes. The piano lessons are played on your own keyboard - any keyboard with a USB-MIDI or Bluetooth MIDI output - which is mapped into the headset so the notes you see sit on the keys you touch. Taiko drums and marimba need no extra gear at all.
Which keyboards work with Museverse?
Most keyboards that send MIDI over USB or Bluetooth work, from 25-key travel keyboards to full 88-key digital pianos. If you are not sure about yours, ask in the Discord before you buy anything - someone there has probably tried it.
Does the first lesson need an internet connection?
No. Museverse works offline once installed, so you can practice on a train, in a hotel room, or anywhere the wifi is bad. Your progress is stored on the headset itself.
Is Museverse a subscription?
No. It is a one-time purchase on the Meta Quest Store. Everything described here is part of the app.